This is the project site for the remake of a 1956 Shasta Travel Trailer - click on a picture to enlarge!
This started in 2011 as an idea for just getting some R & R and getting out of the city. The old camper was a novelty - buy it and fix it up, just like a house - what we already do. A bit more complicated. Some planning involved. Finding one in fixer shape was the goal, so as to remodel it to our standards and likes. Located one advertised on- line in Nipomo, CA. As one might expect, it was in a field behind a house, unused for years, and nothing worked on it except it rolled. Back View: about 14' long, 6'2" wide and just tall enough to stand in without hitting your head on the ceiling (6 ft).
The challenge was to make it self sufficient in a small space (~100 sq ft); make it efficient, and comfortable (a bathroom, too).
The challenge was to make it self sufficient in a small space (~100 sq ft); make it efficient, and comfortable (a bathroom, too).
These are fresh water tanks that were used to hand pump into the sink faucet. I kept one for a gray water tank. I also saved the metal strap on the center of the wall - used to hook table to the wall. More later.
Back view inside: leaking windows had no flashing; no insulation worth mentioning; 2 ice boxes (left); horrid electrical; and an interior gas lamp to go to sleep to (CO poisoning?).
I trashed all of it. I kept the frame and started over. Saved the tail light for the license plate, the seats, the oven, the sink, and the metal outside to use as a template for the curved shapes. Saved the access hatch on the outside.
Extend the frame:
The goal was to make a bathroom inside and have room for storage. First had 4 ft length of steel of the same stock welded on between wheels and hitch. Then added more struts across for floor support and tank placements.
Re-used one tank, had another made. Note: should have used a larger vent pipe for venting the tanks to allow better drain flow into the tanks. Will rework this in the future. The flexible clear 1/2" lines are too small for vents.
Came with these mag wheels. Now it has been replaced with steel wheels and a larger axle.
Plywood deck is warmer and easy to nail to. Made these lined wheel wells to keep the water out and built on top of them.
This is the template created from the skin of the old camper plus some added height and modifications for windows. Floor plan was created by me, and implemented using stock 1 x 4 wood (net) cut down to 1 x 3 for weight savings. Glued and stapled together. Used 1/2" plywood glued up for making the corners round.
Standing the walls was exciting - it gave a real sense of how big it was going to be. The added height was a bonus and was used for storage.
Reinforcing the walls also was meant to hold the skin on the inside and outside. The outside had 1/4" plywood and the inside had a mix of 1/4 " and smaller to make the curved ceilings.

Rough cabinets going in. Shower/toilet at the end of the cabinetry (white foam area).

Wiring, cabinets, seat.
The insulation was the same thickness as the wood. Wiring it up for ac and dc took planning, and working the insulation around it.
Shower/toilet framing: custom shower pan with a flange for a toilet. Real small. But it works. Covered plywood with FRP wall to wall, around the window. But not the ceiling - It's wood and has an exhaust fan. All wood was coated with water-based wipe-on poly.
House wrap is not an advertisement - just a product that happened to come from there. Tyvek tape did the sealing.
Had the skin made up in Hemit with one of the last remaining skin providers that could but grooved lines. I will called it in Hemit and trucked it back. Had to improvise the corners with some stock available from a camper supply, hammering and bending as we went. Screwed off siding to the frame with stainless screws. Caulked and prepped for spraying.
Interiors:
Table folds up and under the seats in the middle to support the cushion folded out flat: for a full bed. Coil cushions actually feel good as a bed.
Sink and stove were re-enameled. Vinyl floor glued down for ease of cleanup. Tiles are ceramic from Dal Tile.
Bed platform conceals 30 gal water tank, battery compartment, ac/dc panel and converter, pump and valve for inside or exterior water; and storage for 2 ice chests. Compartment under stove has water heater (gas/elec.); under cab lighting - one original lamp converted to LED.
Stove was worked on a bit - back burner not there - missing. Grate had a weld and couldn't be enameled. Added high temp silicone gasket to door and it can get up to 500 degrees now - good for pizza!
Storage hatch - like an airplane. Electrical and water connection next to it - located just where the RV hook ups go at the camp sites.
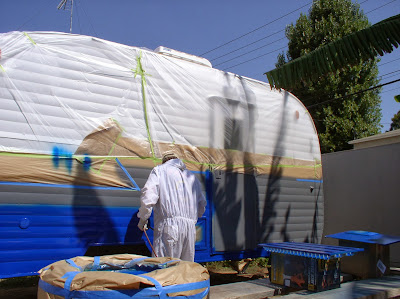
Start painting: primer.
Paint is more expensive than I thought: found a stock color that would work. Go N.S.
Planned on a canopy - made some stakes and had the fabric woven up into the canopy.
After


